1. Authors
-
Kara J. Matthews1
-
Aedon S. Talsma1
-
Thersea Fabian
1 EarthByte Research Group, School of Geosciences, University of Sydney, Australia
2. Aim
This tutorial is designed to teach the user how to import time-dependent raster images into GPlates. Screen shots have been included to illustrate how to complete new steps within each exercise.
3. Included Files
The data bundle for this tutorial can be downloaded here. It includes the following GPlates compatible feature files:
-
EarthByte Global Rotation Model
-
EarthByte Global Coastline File
-
Outlines of the Carpentaria Basin, Queensland Plateau and the Marion Plateau (USGS data)
-
Well locations for three wells north and northeast of Australia: Duyken 1 and ODP Sites 1193 and 1198
And the following raster files:
-
Global Time-Dependent Dynamic Topography File (0 → 100 Ma) (data from EarthByte)
-
Time-dependent images for seismic tomography modelsPRI-S05 (Montelli et al., 2006) and MIT-P08 (Li et al, 2008)
-
Global Time-Dependent Oceanic Crustal Age Files (0 → 140 Ma) (Muller et al., 2008)
Additional datasets and files, including rotations, coastlines, isochrons, spreading ridges and COB files can be downloaded at the following site:
4. Background
Raster images comprise 2-dimensional grids of pixels, or points of colour, that are stored in image files such as JPEGS. Note that they differ from vector images that are composed of points and line segments.
Global and regional raster images can be displayed in GPlates. They are essentially draped over the 3D globe to form an individual layer upon which other data can be superimposed.
This functionality assists with visualising data sets, by placing them in their global context. When combined with other reconstructable data sets (e.g. coastlines, plate boundaries etc) raster images can effectively constrain where points, polylines and polygons are digitised. GPlates also supports time-dependent rasters, that is, a set of raster images whose pixels change with time.
See the GPlates online manual for further information.
-
GPlates currently supports the widely-used JPEG image format.
-
Rasters can only be viewed on the 3D globe projection.
-
GPlates assumes that rasters extend from -180 to 180 degrees (longitude) and -90 to 90 degrees (latitude), if this is not the case then the bounds of the image must be specified (click: Layers → Set Raster Surface Extent…).
-
Linear projections are preferable, however images of any projection can be imported. It is important to be careful when interpreting images of other projections, as they may be slightly distorted.
-
Time-dependent rasters must conform to a specific file name format e.g. age_grids-1.jpg (where "-1" signifies that the image corresponds to 1 Ma).
-
Time-dependent rasters must correspond to "whole number" ages, i.e. 2 Ma, 34 Ma, 140 Ma etc, NOT 2.2 Ma, 3.01 Ma, 40.32 Ma etc.
-
If the period of time between the individual raster images, in a time-dependent raster sequence, is longer than 1 Myr then each image in the sequence will be updated on the globe at the half way age. For example, if a time-dependent raster sequence is loaded that has an interval of 10 Myr then the 10 Ma raster will be displayed on the globe from 5 Ma - 14 Ma then the 20 Ma raster will be displayed from 15 Ma to 24 Ma etc.
5. Exercise A - Importing Time-Dependent Rasters
Dynamic topography is vertical motion of the Earth’s surface attributed to mantle processes. For example, subducting slabs viscously drag down overlying crust as they sink through the upper mantle, whereas hot upwellings push up overlying crust. For an informative overview of dynamic topography, the 2001 Scientific America article "Sculpting the Earth from Inside Out" by Professor Mike Gurnis is a good place to start (http://www.gps.caltech.edu/~gurnis/papers.html).
In this exercise we will be importing a sequence of time-dependent raster images showing dynamic topography since the Mid-Cretaceous (0 - 100 Ma). These images have been generated at 1 Myr intervals.
-
File → Open Time-dependent Raster Sequence… (Figure 1) → locate folder called Dynamic Topography in the Importing_Rasters data bundle → click on the folder and click Choose (you cannot select an individual JPEG when loading a Raster Sequence)
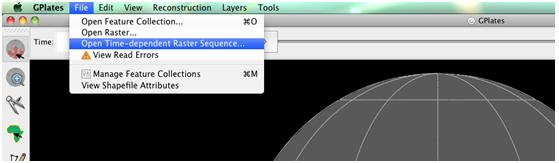
Figure 1: Step 1 - Navigating the menu bar to open time-dependent raster sequences.
If you have previously been working with a regional raster image, and have not closed and reopened GPlates, you will notice that the loaded image has been compressed to fit inside the region you have been working on. To fix this problem you must reset the surface extent of the raster image.
-
Layers → Set Raster Surface Extent… → Reset fields to (-90, 180) (90, 180) (Figure 2)
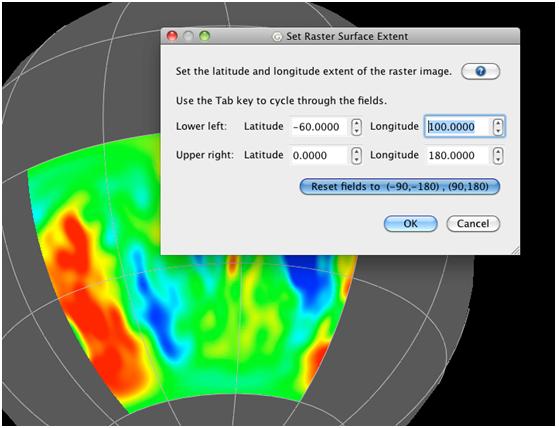
Figure 2: Step 2 - Resetting the surface extent of the raster images to fit a global domain.
To make these rasters more geographically meaningful, let’s open a coastline file.
-
File → Open Feature Collection… → locate Global_EarthByte_GPlates_Coastlines_20091014.gpml in the Importing_Rasters data bundle → Open
Unless we load a rotation file the coastlines (and any other datasets we want to visualise) will remain fixed in present-day coordinates.
-
File → Manage Feature Collections → Open File… → locate Global_EarthByte_GPlates_Rotation_20091015.rot in the Importing_Rasters data bundle → Open
Now use the Animation Controls and/or Time Controls (in the Main Window above the globe - Figure 4) to reconstruct the image sequence back through time. Blues indicate negative dynamic topography, whereas reds indicate positive dynamic topography. To watch the evolution of the dynamic evolution of the Earth’s surface since 100 Ma, set the Time to 100.00 and then press the Play button. See www.gplates.org/user-manual/Reconstructions.html for more details about manipulating animations.

Figure 3: Time and Animation controls in the main window. You may use these controls to manually enter a time, move the slider to reconstruct the globe or animate from a selected time to the present.
Time-dependent raster sequences can be combined with other reconstructable datasets in order to analyse and investigate features in the geological record. We will now exploit this functionality in order to see why dynamic topography is reflected in the geological record of several Australian basins and oceanic plateau. Evidence for negative dynamic topography can be expressed as anomalous tectonic subsidence. By analysing stratigraphic data (obtained from exploration wells) we can calculate how a region has subsided over time. Anomalous subsidence can then be isolated by removing the predicted subsidence for the area, that is, subsidence expected from thermal cooling resulting from lithospheric stretching, or flexure due to the emplacement of a heavy load. Knowledge of the tectonic history of the region in question will further help determine if dynamic topography is a potential cause of the anomalous subsidence.
Cenozoic anomalous tectonic subsidence, induced by mantle convection processes, is recorded in wells north and northeast of Australia (e.g. DiCaprio et al., 2009; Heine et al., 2009; DiCaprio et al., 2010). This dynamic topography, including a 300 m downward tilt of the continent to the northeast, is due to the Australian Plate migrating towards the subduction zones of Southeast Asia (DiCaprio et al, 2009). We will now load into GPlates the outlines of the Carpentaria Basin, Queensland Plateau and Marion Plateau; focus regions of the above authors.
-
File → Manage Feature Collections → Open File… → locate and select CarpentariaBasin.gpml, QueenslandPlateau.gpml and MarionTerrane.gpml in the Importing_Rasters data bundle → Open
We will also load in the locations of several wells that have recorded anomalous tectonic subsidence in the Cenozoic.
-
File → Manage Feature Collections → Open File… → locate Wells_Australia.gpml in the Importing_Rasters data bundle → Open (Figure 4)
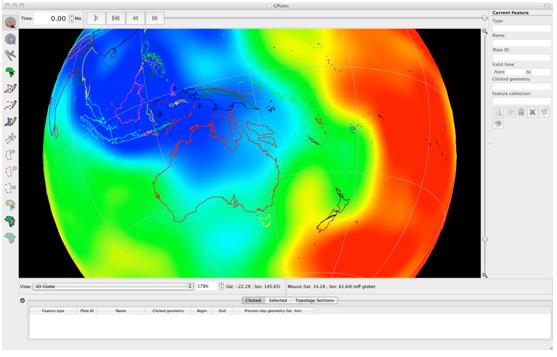
Figure 4: View of the Australian region with basin outlines and well data loaded into GPlates.
Now play the animation through from 100 - 0 Ma (as you did previously at the end of PART A).
How does the dynamic topography signal evolve in the focus areas we have loaded?
You will notice that the negative signal strengthens as Australia migrates in a north-northeasterly direction.
We will now be using a combination of regional time-dependent rasters and reconstructable data sets to reveal an assumed Late Cretaceous-Early Tertiary "slab window" beneath Sundaland (Whittaker et al., 2007) - a region of Southeast Asia comprising the Malay Peninsula, Borneo, Java, Sumatra and the surrounding islands.
SLAB WINDOWS
Slab windows form as a result of spreading ridges intersecting subduction zones (Dickinson and Snyder, 1979). When ridges are subducted the down-going plates continue to diverge, yet due to an absence of ocean water to cool the upwelling asthenosphere and form new oceanic crust, the plates no longer continue to grow and a gap develops and widens. Seismic tomography enables us to visualise slab windows from present-day and past subduction.
SEISMIC TOMOGRAPHY
Seismic tomography is a method for imaging the Earth’s interior; revealing regions of past and present subduction, and hot mantle upwellings. It involves establishing how fast seismic waves (elastic waves) travel through the mantle, for example seismic waves generated by earthquakes. This information is then used to infer regions of anomalously hot or cold material; "anomalous" is judged as deviating from a global reference model (e.g. PREM - Dziewonski and Anderson, 1981). As the speed of seismic waves travelling through the mantle is influenced by temperature, velocity can be used as a proxy for temperature (fast velocities = cold material, slow velocities = hot material). However, mantle composition also affects the speed of wave propagation, and therefore establishing correlations between velocities and mantle structures is not simple.
The Importing_Rasters data bundle includes 2 sequences of regional time-dependent raster images showing seismic tomography. These images were generated from the seismic tomography model PRI-S05 (Montelli et al., 2006) and model MIT-P08 (Li et al., 2008). Although seismic tomography is a method for imaging the structure of the present-day mantle, by establishing a relationship between slab depth and slab age (i.e. when the slab was being subducted at the surface, NOT the age of the oceanic crust) we can use tomography data to learn about past subduction zones. By examining the relationship between subducted materials sinking velocity and its current depth, we can make estimates about the age of subducted material. Table 1 displays the corresponding depth of the age coded tomography slices.
| Depth Slice (km) | Age (Ma) |
|---|---|
0 |
0 |
240 |
5 |
480 |
10 |
684 |
15 |
744 |
20 |
804 |
25 |
864 |
30 |
924 |
35 |
984 |
40 |
1044 |
45 |
1104 |
50 |
1164 |
55 |
1224 |
60 |
1284 |
65 |
1344 |
70 |
1404 |
75 |
1464 |
80 |
1524 |
85 |
1584 |
90 |
1644 |
95 |
1704 |
100 |
1764 |
105 |
1824 |
110 |
1884 |
115 |
1944 |
120 |
2004 |
125 |
2064 |
130 |
2124 |
135 |
2184 |
140 |
2244 |
145 |
2304 |
150 |
2364 |
155 |
To begin we need to unload the data used in PART B that is not necessary for PART C. Therefore, unload CarpentariaBasin.gpml, QueenslandPlateau.gpml, MarionTerrane.gpml and Wells_Australia.gpml. We do not need to unload the coastline file as we want to see how the continents, specifically the Sunda Block, have moved through time with respect to the slabs inferred from the seismic tomography.
-
File → Manage Feature Collections → click the eject symbol that applies to each of the above-mentioned files (far right icon under the "Actions" tab, see Figure 5). Only one raster image/sequence can be loaded at one time, therefore loading another raster will cause the current one to be replaced.

Figure 5: The eject button, under "Actions" (far right) allows data files to be unloaded from GPlates.
We will now load in the seismic tomography raster sequence.
-
File → Open Time-dependent Raster Sequence… → locate folder called Montelli06_S in the Importing_Rasters data bundle → click on the folder and click Choose (you cannot select an individual JPEG when loading a Raster Sequence)
We are dealing with a regional raster sequence and therefore we need to adjust the surface extent of the rasters so that they are not stretched out to cover the whole globe (Figures 6 and 7).
-
Layers → Set Raster Surface Extent… (Lower left coordinates are: -20.0000 latitude and 80.0000 longitude; Upper right coordinates are: 30.0000 latitude and 130.0000 longitude)
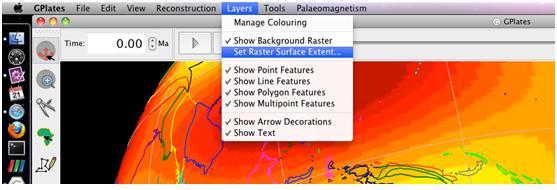
Figure 6: When loading regional rasters you must tell GPlates the surface extent of your images, this is achieved using the Set Raster Surface Extent… window.
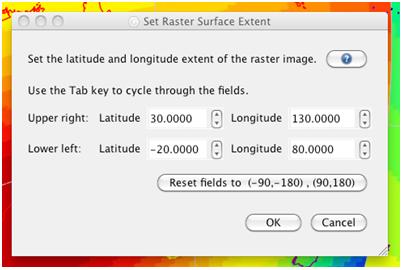
Figure 7: The Set Raster Surface Extent window allows you to readjust the bounding latitudes and longitudes of regional rasters.
You should now be able to see a seismic tomography image in the region of Sundaland (Figure 8).
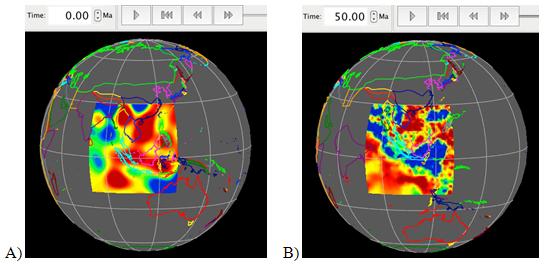
Figure 8: Snapshot of the Sundaland region with time dependant seismic tomography loaded. A) Tomography model is Montelli06_S at 0 Ma. B) Tomography model is MITP08 at 50 Ma.
We want to use this raster sequence to find the assumed slab window that was open between ~70 - 43 Ma in the Late Cretaceous-Early Tertiary. Subduction zones can be identified from seismic tomography images as regions of anomalously fast velocities*. This is because the subducting slab is colder (and denser) than the ambient mantle. It thus follows that a slab window can be seen as a break in the fast velocity region. *Note - Blues indicate anomalously fast velocities and so we will interpret these regions as subducting slabs.
Rather than animating 140 Myr worth of data, lets use the Animation controls to specify our 70 - 43 Ma timeframe.
-
Reconstruction → Configure Animation… (italicised numbers below, need to be entered into the Animate window that opens) (Figure 9)
-
Animate from 70.00 Ma
-
To 43.00 Ma
-
With an increment of 1.00 M per frame.
-
Frames per second: 3.00 (you can experiment with this if you like)
-
Current time: 70.00 Ma
-
When you have finished adjusting the animation controls click the Play button, make sure to move or close the Animate window so that it does not block your view of the GPlates globe.
-

Figure 9: The Animate window enables you to specify a specific time period to animate on the globe.
Can you see the slab window?
Clue - Look for a break in the blue "blobs".
Now that we have visualised the slab window lets digitise it. In this example we will digitise the position of the slab window at 60 Ma using an oval shape. Figure 10 below is an example of the 70 Ma slab window, use this as a guide when you make your 60 Ma slab window.

Figure 10: Digitised slab window at 70 Ma.
-
Click the Digitise New Polygon Geometry icon
 located in the Tool Palette on the left hand side of the globe → click around the slab window in an oval shape (use Figure 10 above as a guide). Remember that if you make a mistake, or you are not happy with the shape of your polygon, then you can use the geometry editing tools from the Tool Palette to move the existing vertices
 , add new ones
 or delete them all together
 → Create Feature… (from the New Geometry Table to the right of the globe) → gpml: (UnclassifiedFeature) → Next → Leave the default setting for the property that best indicates the geometry’s purpose → Plate ID: 301 (the slab window lies on the Eurasian Plate) → Begin (time of appearance): 60.00 Ma → End (time of disappearance): 60.00 Ma → Choose a name for the feature e.g. "SundalandSlabWindow60Ma" → Next → Create a new Feature Collection → Create
You have now created your 60 Ma slab window and added it to a new Feature Collection. However, remember that you need to save it, so open your Manage Feature Collections dialog (File → Manage Feature Collections) and save the feature using a new name
 and the gpml format. This Feature Collection can now be loaded into GPlates when you next open the program.
Alternatively you could have exported the polygon geometry as a file of longitudes and latitudes and visualised them, for example using GMT (Generic Mapping Tools - Wessel and Smith, 1998). To do this follow the methodology you learnt in the Creating New Features Tutorial (i.e. you would select the Export… button in the New Geometry Window to the right of the globe and chose the GMT file format).
From this exercise we have shown that seismic tomography combined with plate reconstruction software (GPlates) can help geoscientists to learn about past plate boundary configurations. Our slab window helps constrain the location of the spreading ridge that was being subducted 60 Ma (the Wharton Ridge).
This is just an example using one tomography model. If you would like to compare the different models, go back to step 8 and load a new set of time dependant rasters (Figure 9) from the folder called MIT-P08
GPlates can further be employed to compare the location of the slab window inferred from seismic tomography with its location inferred from other data sources, for example plate tectonic reconstructions. We will now load in EarthByte’s time-dependent crustal age sequence from the Importing_Rasters data bundle.
-
File → Manage Feature Collections → Open File… → locate and select age grid jpegs in the Importing_Rasters data bundle → Choose
This is a global raster sequence so make sure you adjust the raster surface extent.
-
Layers → Set Raster Surface Extent… → Reset fields to (-90, 180) (90, 180)
Spend some time reconstructing the raster sequence using the Animation and/or Time controls - you can see how old the oceanic crust is in various areas of the world.
We will now compare the location of the slab window that you inferred from seismic tomography to the location where the youngest oceanic crust (and hence the crust adjacent to the spreading ridge) is being subducted beneath Sundaland - for simplification we will assume that the spreading ridge is positioned at the centre of the youngest oceanic crust (Figure 11). In other words we will be comparing "our" slab window with the approximate location of the slab window inferred from a plate kinematic reconstruction. Note - youngest crust is coloured red.
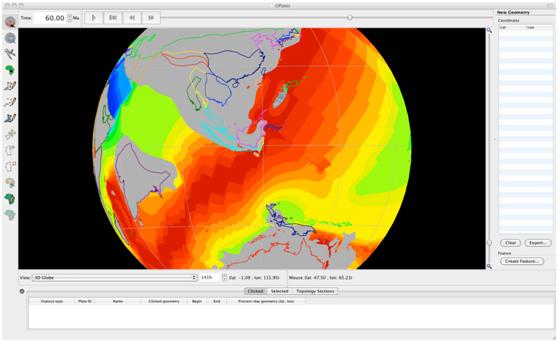
Figure 11: 60 Ma reconstruction of ocean floor ages and present-day coastlines. Notice that the youngest oceanic crust (and hence the spreading ridge) is converging with western most Sundaland.
Rotate the globe to centre on Sundaland and use the Time controls to jump to 60 Ma (Figure 11).
How does your digitised slab window compare to the location of subduction of the Wharton Ridge (and hence the kinematically inferred slab window)?
If you would like to learn more about how seismic tomography is being used to constrain the location of the Wharton Ridge and slab window beneath Sundaland during the Late Cretaceous to Early Tertiary, see Fabian et al. (2010).
6. Exercise B - Creating JPEGS to Import as Rasters
In this exercise we will learn how to create JPEGS that can be loaded into GPlates, using the example of a global gravity raster. This workflow can then be easily modified to suit other data that you may want to visualise. It should first be noted that this exercise assumes that you have GMT (Generic Mapping Tools - Wessel and Smith, 1998). The GMT software is free to download. See http://gmt.soest.hawaii.edu/ to learn more.
The following GMT commands will transform an IMG file into gridded data that can then be visualised and saved as a JPEG. In future, when adapting this workflow only use the commands necessary for the data you have, for example, if you start off with a set of grid files then ignore the "img2grd" step, as you obviously don’t need to convert an IMG file into gridded data.
Note: each set of commands is to be written on a single line. You may run each line individually in turn in a terminal, or you may write a simple script with all the lines and execute the script in one go. The Importing_Rasters data bundle contains a folder called Making_Gravity and in this folder is an example script making_gravity.sh, and the IMG file grav.img (from Sandwell and Smith) that is required as input.
img2grd grav.img -Gworld_gravity.grd -R-180/180/-80.738/80.738 -T1 -D-80.738/80.738 -V -m1 -E -S0.1
img2grd |
GMT tool to convert the IMG file to a netcdf grid (GRD) |
grav.img |
Input IMG file |
-G |
Output GRD file — specifies the name of the GRD file |
-R |
Defines the geographic region of interest (west/east/south/north) |
-T |
Forces GMT to get values at ALL points |
-D |
Forces GMT to use the extended latitude range (and not the default -71.006/72.006) |
-V |
Commands are run in verbose mode (tells you when you have done something wrong!) |
-m |
Specifies the minute width of input IMG pixels (minutes of longitude) |
-E |
Forces GMT output to have same regional extent as input |
-S |
Scaling factor - scales the IMG grid value (in this case each cell is multiplied by 0.1 to get the correct mGal value) |
grd2cpt world_gravity.grd -Chaxby -S-60/60/20 -V > gravity.cpt
grd2cpt |
GMT tool to make a colour palette from a GRD file |
world_gravity.grd |
GRD file from which cpt file will be created |
-C |
Selects the colour table to be interpolated (GMT has a range to choose from) |
-S |
Defines the start z-value, stop z-value and interval of the cpt file |
-V |
Commands are run in verbose mode (tells you when you have done something wrong!) |
gravity.cpt |
Name of generated cpt file |
grdimage world_gravity.grd -Jx0.07d -R-180/180/-80.738/80.738 -Cgravity_all_test.cpt -X0c -Y0c -V > world_gravity.ps
grdimage |
GMT tool to create a coloured (or greyscale) image from 2D netCDF gridded data |
world_gravity.grd Input GRD file |
-J |
Specifes projection and size of the image. x denotes a non-linear projection with 0.07 defining the map scale - use X to define map width, for example in cm. d informs GMT that your data is geographical (rather then a Cartesian), this is important if you want to also plot other geographical data such as coastlines. |
-R |
Specifies the geographic region (west/east/south/north) |
-C |
Names the colour palette table to be used |
-X -Y |
Specifes the plot origin (in this case 0 cm and 0 cm) |
-V |
Commands are run in verbose mode (tells you when you have done something wrong!) world_gravity.ps |
Name of generated postscript file |
ps2raster gravity_all_test.ps -Tj -E300 -A -P
ps2raster |
GMT command to convert postscript files to other formats using GhostScript. Must have GhostScript installed, see www.ghostscript.com |
world_gravity.ps |
Name of postscript file to be converted to a new format |
-T |
Specifies output format (j=JPEG) |
-E |
Specifies raster resolution in dpi |
-A |
Adjusts the bounding box to the minimum size actually required by the image - this is extremely important for creating JPEGs for GPlates as it eliminates any white empty space around the image |
-P |
Forces landscape plots to be rotated to portrait orientation |
Now that you have a global raster (your new JPEG), try importing it into GPlates (following the steps in Exercise A). In this case you must also set the raster extent. Although your raster indeed extends from -180 to 180 degrees, it only contains data between latitudes -80.738 and 80.738 degrees.
-
Layers → Set Raster Surface Extent (Figure 12)
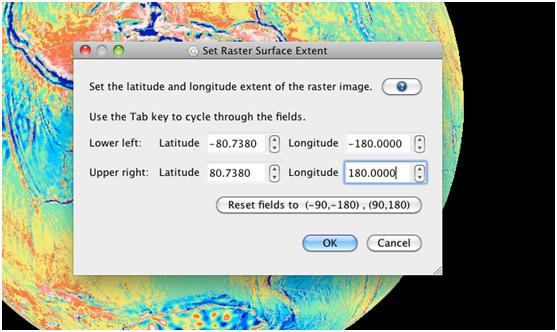
Figure 12: Setting the surface extent of the raster image so that it wraps around the globe but only shows data between the specified latitudes.
What will happen if you don’t adjust the surface extent of the raster?
GPlates assumes that rasters extend from -180 to 180 degrees longitudeand -90 to 90 degrees latitude, therefore it will stretch your JPEG to the poles whereby distorting the image and making impossible to make an accurate analysis of your data!!
7. References
DiCaprio, L., M. Gurnis, and R. D. Muller, Long-wavelength tilting of the Australian continent since the Late Cretaceous, Earth. Planet. Sci. Lett., vol 278, p. 175-185, 2009.
DiCaprio, L., R. D. Muller, and M. Gurnis, A dynamic process for drowning carbonate reefs on the Northeastern Australian Margin, Geology, vol 38 (1), p. 11-14, 2010.
Dziewonski, A. M., D. L. Anderson, Preliminary reference Earth model, Phys. Earth Planet. Int., vol 25 (4), p. 297-356, 1981.
Fabian, T, J. M. Whittaker, and R. D. Muller, Ground-truthing proposed slab window formation beneath Sundaland using Seismic Tomography, ASEG-PESA 2010 International Geophysical Conference and Exhibition, Sydney, Australia (August 22nd-26th).
Heine, C., R. D. Muller, B. Steinberger, and L. DiCaprio, Integrating deep Earth dynamics in paleogeographic reconstructions of Australia, Tect. Phys., In Press.
Li, C., R.D. van der Hilst.. E.R. Engdahl., S. Burdick, A new global model for P wave speed variations in Earth’s mantle. Geochem., Geophys., Geosyst., vol 9 (5), 2008.
Lithgow-Bertelloni, C., and M. Richards, The dynamics of Cenozoic and Mesozoic plate motions, Reviews of Geophysics, vol 36(1), 27-78. 1998
Montelli, R., G. Nolet, F. A. Dahlen, and G. Masters, A catalogue of deep mantle plumes: New results from finite-frequency tomography, Geochem., Geophys., Geosyst., vol 7 (11), 2006.
Muller, R. D., M. Sdrolias, C. Gaina, B. Steinberger, and C. Heine, Long-term sea-level fluctuations driven by ocean basin dynamics, Science, vol 319, p. 1357-1362, 2008.
Richards, S., G. Lister, and B. Kennett, A slab in depth: Three-dimensional geometry and evolution of the Indo-Australian Plate, Geochem., Geophys., Geosyst., vol 8 (12), 2007.
Wessel, P., and W. H. F. Smith, New improved version of Generic Mapping Tools released, EOS Trans. Amer. Geophys. U., vol. 79 (47), pp. 579, 1998.
Whittaker, J. M., R. D. Muller, M. Sdrolias, and C. Heine, Sunda-Java trench kinematics, slab window formation and overriding plate deformation since the Cretaceous, Earth. Planet. Sci. Lett., vol 255, p. 445-457, 2007.